


Eiffel Tower Photography Tips and Tricks: Full Guide
Guide your photography journey with this comprehensive guide to capturing the Eiffel Tower in all its glory! From the serene reflections at Trocadéro at sunrise to the enchanting night twinkles, you’ll discover the best spots and tips for both day and night photography. Learn how to embrace the seasonal variations like spring’s cherry blossoms and winter’s festive lights while avoiding the crowds by opting for early mornings or late evenings. Get ready to manage your expectations as you transform the Instagram dream into stunning reality!
Key Takeaways:
- Best Shooting Location: The Trocadéro offers stunning reflection shots, especially at sunrise.
- Night Photography Tips: Capture the Eiffel Tower’s twinkling lights with long-exposure settings for vibrant night shots.
- Secret Spots: Find unique perspectives by shooting from Rue de l’Université for a ground-up view.
- Seasonal Variations: Explore different times of year—spring for cherry blossoms and winter for festive lights.
- Avoiding Crowds: Early mornings and late evenings provide the best opportunities for less crowded shots.
Understanding the Eiffel Tower
Before you start photographing the iconic Eiffel Tower, it’s crucial to understand its rich history and architectural brilliance.
This knowledge will provide you with a deeper appreciation and perspective as you capture its beauty from various angles, especially at spots like Trocadéro during sunrise or Rue de l’Université for unique ground-up shots.
Brief History of the Eiffel Tower

The Eiffel Tower was completed in 1889 as the centerpiece for the Exposition Universelle, marking the 100th anniversary of the French Revolution.
Designed by engineer Gustave Eiffel, this remarkable structure was initially met with skepticism but has since become a global symbol of Paris and a feast for photographers.
Architectural Features Worth Noting
While capturing the Eiffel Tower, pay attention to its intricate iron lattice design and the stunning interplay of light and shadow throughout the day.
The tower stands 300 meters tall and features three observation decks that offer unique perspectives, making it a feast for your camera.
Brief details like the ironwork’s unique patterns and the overall structural symmetry are noteworthy. As the sunlight changes, you’ll find how it dramatically alters the tower’s appearance, creating opportunities for you to experiment with different angles and settings.
Don’t miss the chance to capture the elegant arches and the delicate curvature of the structure—it’s what makes your shots truly captivating.
Symbolism and Cultural Significance
You’ll find that the Eiffel Tower is more than just a breathtaking structure; it represents the spirit of innovation and French culture. It serves as a landmark of romance and nostalgia for many, making it an attractive subject for your photography.
Cultural significance is deeply rooted in the Eiffel Tower, symbolizing freedom and artistic expression. It has witnessed countless historical events, becoming a beloved monument in the hearts of locals and tourists alike.
When you photograph it, you’re not just taking a picture; you’re capturing a piece of history and the vibrant essence of Paris.
Types of Photography Techniques
You can use various photography techniques to capture stunning shots of the Eiffel Tower. Here are a few approaches to consider:
| Technique | Description |
|---|---|
| Landscape | Focus on the surroundings and wide-angle shots. |
| Portrait | Include people for personal context with the tower. |
| Long Exposure | Create smooth effects when capturing light movements. |
| Reflections | Utilize puddles or glass for creative compositions. |
| Night Photography | Capture the illuminated tower and surrounding lights. |
Landscape Photography Approaches
Photography enthusiasts can explore many landscape approaches around the Eiffel Tower. Use different angles to highlight nearby gardens or the Seine River.
Early mornings or late afternoons offer beautiful lighting and fewer crowds for you to capture those pristine shots.
Don’t overlook the seasonal changes, like vibrant spring cherry blossoms or enchanting winter lights, to enrich your landscape photographs. This adds variety to your portfolio.
Portrait Photography with the Tower
Types of photography offering portrait opportunities near the Eiffel Tower allow you to include personal stories in your images. The tower serves as a stunning backdrop, making your subjects stand out with an iconic setting.

Photography in this genre can range from candid shots of loved ones enjoying their time near the Eiffel Tower to posed portraits highlighting the structure’s grandeur.
Utilizing natural light at sunrise or sunset ensures soft tones and creates a more intimate atmosphere. Consider framing your subjects against the tower for a captivating contrast, emphasizing their connection to this iconic landmark.
This approach will result in memorable images that tell a story.
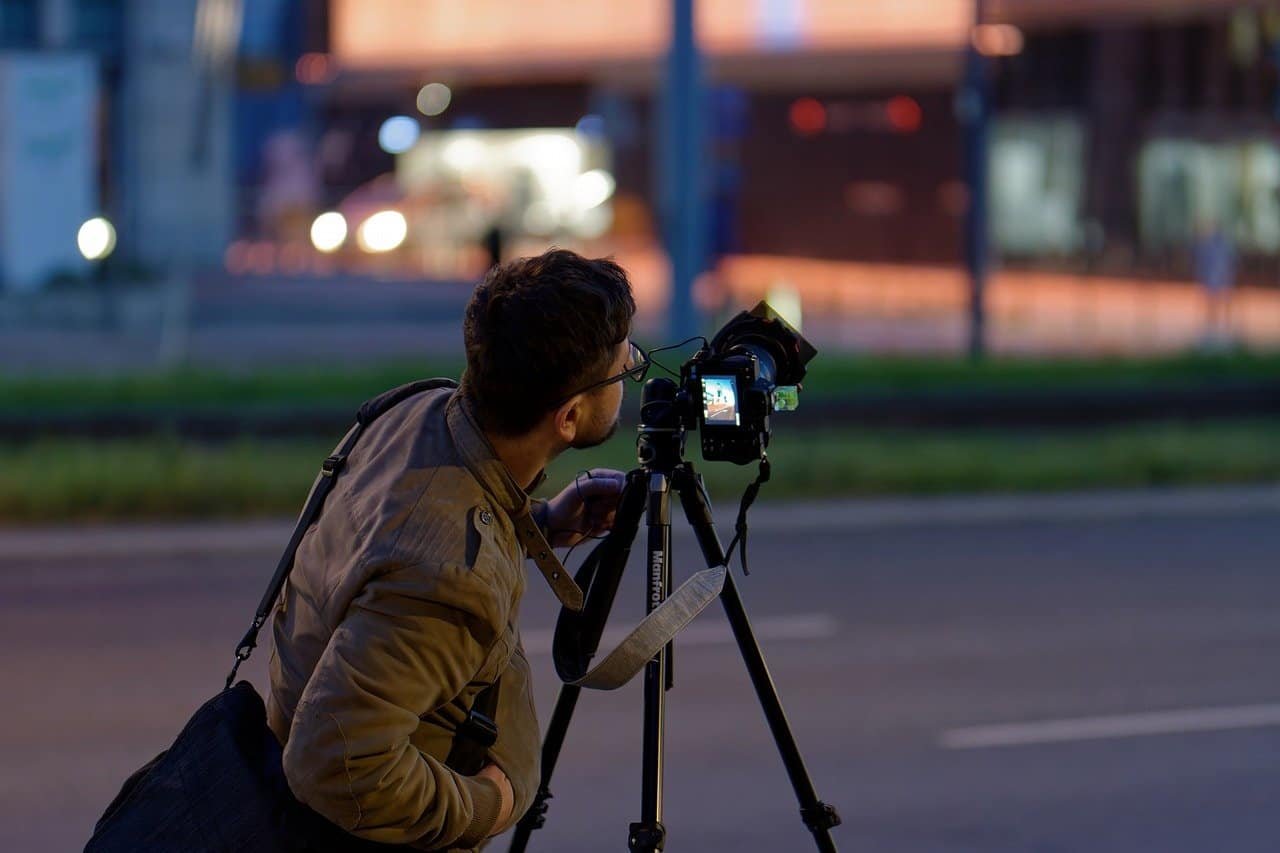
Night Photography for Dramatic Effects
On your night photography adventures, capture the Eiffel Tower in its illuminated glory. The twinkling lights and lively atmosphere create a vibrant scene that’s captivating to shoot.

To achieve dramatic effects, try using long exposure techniques to smooth out the movement of traffic or people. Experiment with different ISO and aperture settings to find the perfect balance for low-light conditions.
Be cautious of your surroundings, as nighttime locations can become unsafe. Lighting your frame properly will enhance the tower’s stunning features, providing a magical backdrop for your night photography.
This practice can elevate your skills and result in breath-taking images.
Best Shooting Locations
For capturing the Eiffel Tower in all its glory, selecting the right location is vital. From iconic viewpoints to hidden gems, each spot offers a unique perspective and atmosphere.
Whether you’re looking for stunning reflections, classic vistas, or secret angles, you’ll find the perfect backdrop for your photos.
Timing is also key; early mornings and late evenings not only help you avoid crowds but also provide that magical light for your shots.
Trocadéro at Sunrise for Reflection Shots
While the Trocadéro is widely recognized for its breathtaking views of the Eiffel Tower, visiting at sunrise allows you to capture stunning reflections in the fountains below.
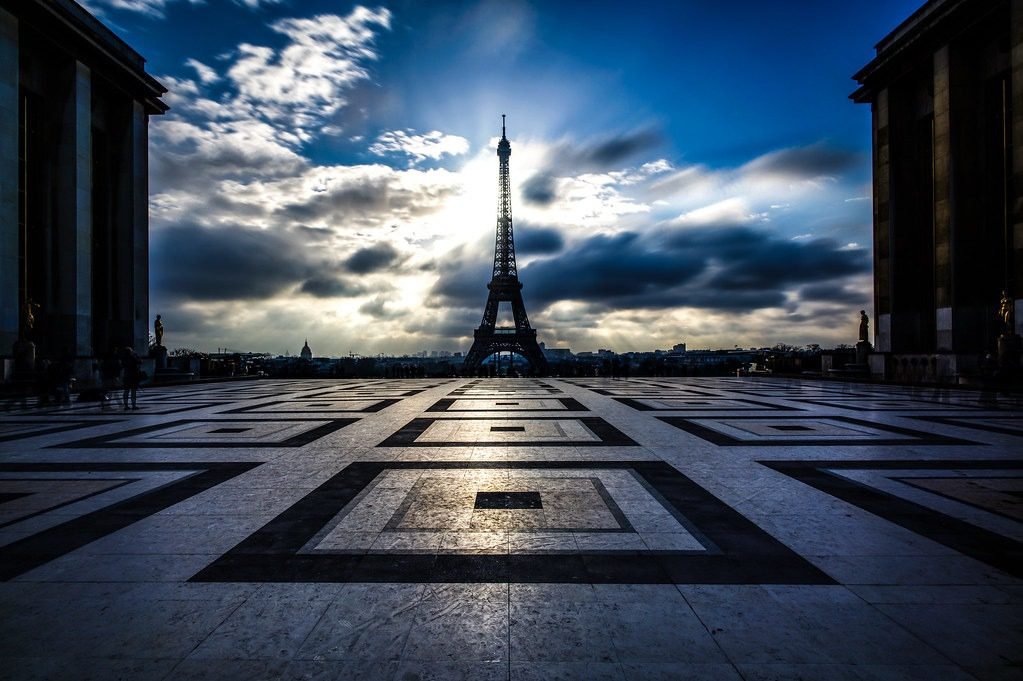
The soft, golden light enhances the beauty of your shots, making it an ideal spot for photographers seeking that perfect image.
Arriving early will ensure you have this iconic location almost to yourself, creating a serene atmosphere.
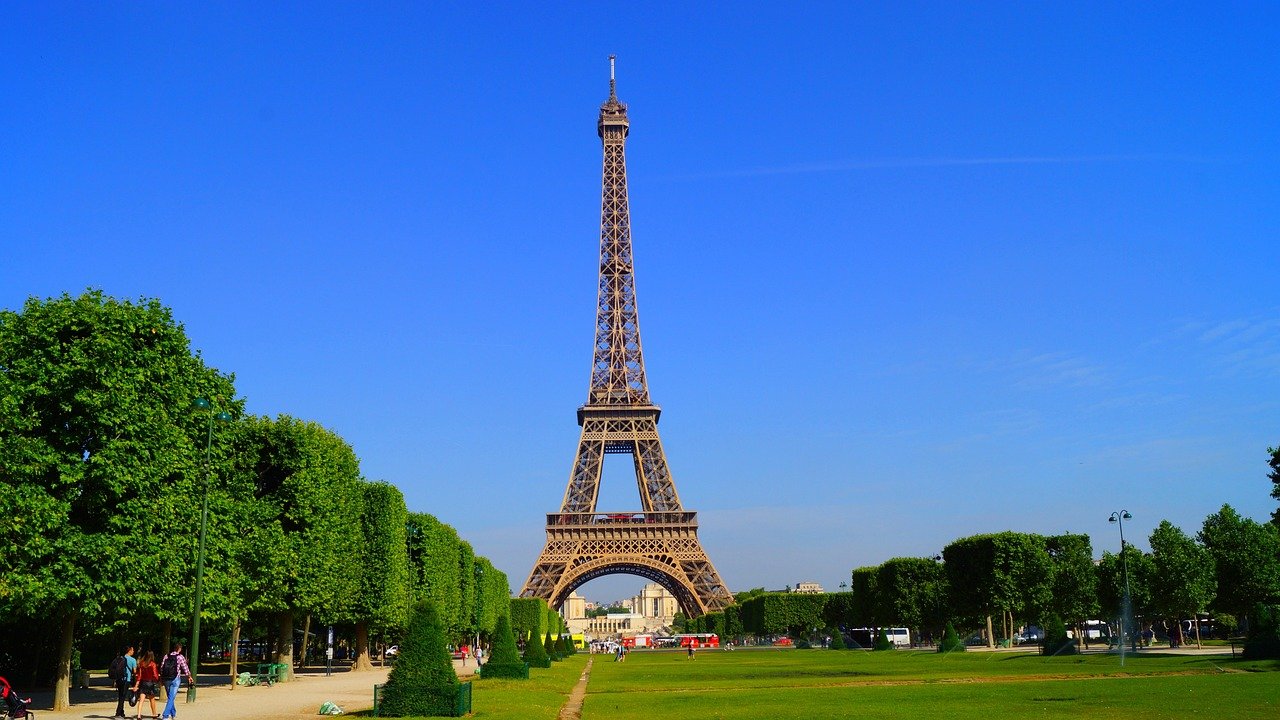
Champ de Mars for Classic Views
An iconic location, the Champ de Mars offers a sweeping view of the Eiffel Tower framed by lush green gardens.
This expansive area is perfect for those looking to encapsulate the grandeur of the tower in a classic setting. With ample space to welcome both wide-angle shots and intimate captures, you can experiment with various compositions.
Classic views abound at the Champ de Mars, especially during the golden hour when the light bathes the tower in warm hues.
You can take advantage of the spacious lawns to include foreground elements, such as people picnicking or leisurely strolling.
As you compose your shots, be sure to explore both the tower’s majestic silhouette and the surrounding beauty of this iconic park.
Secret Spots: Rue de l’Université for Ground-Up Perspective
Now, if you’re looking for a less conventional angle, Rue de l’Université is your destination.
This charming street provides an incredible ground-up perspective of the Eiffel Tower that is sure to make your photos stand out. With the tower rising majestically above the historic buildings, you’ll capture a unique view that many tourists overlook.

Secretly tucked away, Rue de l’Université allows you to shoot from an unexpected angle, emphasizing the tower’s towering presence against the skyline.
The blend of classic Parisian architecture and the Eiffel Tower creates a stunning contrast that is perfect for storytelling in your photography.
Make sure to visit during quiet hours for an uninterrupted shooting experience, ensuring your shots are as authentic and captivating as possible.
Mastering Timing
All great photography starts with impeccable timing. Capturing the Eiffel Tower is all about knowing when to be at the right place to take advantage of extraordinary lighting conditions.
Whether you’re aiming for the soft hues of dawn or the enchanting glow of twilight, understanding the best times to shoot can drastically elevate your images.
Early Morning vs. Late Evening for Lighting
You will find that both early mornings and late evenings offer unique lighting opportunities that bring the Eiffel Tower to life.
At sunrise, the soft, golden light enhances reflections, making locations like the Trocadéro a mesmerizing backdrop. Conversely, the late evening reveals the tower’s brilliance as the sunset fades, complemented by the twinkling lights, creating magical night shots.
Seasonal Variations: Spring Cherry Blossoms and Winter Lights
An eye for seasonal changes will significantly enhance your photography. Springtime cherry blossoms provide a stunning pop of color, framing the Eiffel Tower beautifully.
In winter, the city transforms into a wonderland adorned with twinkling lights, including the tower itself, which offers a romantic perspective perfect for night shots.
Seasonal variations offer a wealth of opportunities for unique shots. In spring, the cherry blossoms around the tower create a vibrant, picturesque setting that contrasts elegantly with its iron structure.
Meanwhile, winter brings not only twinkling lights but also a cozy atmosphere, inviting night photography with the À la mode decorations adding charm to your captures. Each season gives you a distinct aesthetic to explore and feature in your collection.
Avoiding Crowds: Ideal Shooting Times
If you’re keen on capturing the Eiffel Tower without the distraction of crowds, plan your visits during early mornings or late evenings.
These times not only provide stunning light but also keep you away from throngs of tourists, allowing you to focus on your photography.
Timing is everything when it comes to avoiding crowds at the Eiffel Tower. The early morning hours, just before sunrise, grant you serene surroundings perfect for capturing reflective shots.
Late evenings can also be ideal, as many tourists head to dinner, leaving less foot traffic around. By planning accordingly, you can enjoy the iconic landmark in a peaceful setting, enhancing the quality of your shots and your overall experience.
Essential Gear for Eiffel Tower Photography
Despite the beauty of the Eiffel Tower, capturing its essence requires the right gear. Your equipment choices can significantly enhance the quality of your shots, especially at iconic locations like Trocadéro during sunrise for reflection shots.
For insider tips, check out the Best Spots For Taking Eiffel Tower Photo that cover various perspectives and seasonal variations.
Cameras: DSLRs vs. Mirrorless
The choice between DSLRs and mirrorless cameras often comes down to personal preference. DSLRs offer proven performance and battery life, making them excellent for capturing the Eiffel Tower under changing light conditions.
In contrast, mirrorless cameras are lightweight and compact, perfect for mobility, especially when avoiding crowds during early mornings or late evenings.
Lenses: Focal Lengths for Different Perspectives
There’s a world of possibilities with lenses when photographing the Eiffel Tower. A wide-angle lens (14-24mm) can capture the grandeur of the tower alongside the lush landscapes, while a medium zoom (24-70mm) allows for stunning, context-rich shots.
For close-ups that showcase intricate details, a telephoto lens (70-200mm) is ideal.

Tower shots can be transformed by exploring various angles with the right focal length.
Use a wide lens to incorporate surrounding scenery at places like Rue de l’Université for a unique ground-up perspective.
When photographing during seasons like spring with cherry blossoms or winter with festive lights, the proper lens enhances your ability to capture seasonal variations beautifully.
Accessories: Tripods and Filters
Filters can elevate your photos by controlling light and enhancing colors. A circular polarizer reduces glare and improves saturation, perfect for capturing those morning reflection shots.
Additionally, neutral density filters allow for longer exposure times, which are great for dreamy, blurred effects in your images.
Accessories like tripods are vital to steady your camera during low-light conditions, especially for night photography with twinkling lights. They ensure that your images remain sharp, even in longer exposures.
Combining tripods with filters enhances your creativity, allowing you to fully explore the stunning aesthetics of the Eiffel Tower from dawn to dusk.
Technical Settings for Daytime Shots
Your photography journey at the Eiffel Tower begins with understanding the right technical settings for daytime shots. Utilize appropriate Using the image of the Eiffel Tower: Filming and shots to enhance your captures. The ideal settings ensure vibrant colors and dreamy landscapes, allowing the iconic structure to shine in its best light.
Exposure Settings: Aperture, Shutter Speed, and ISO
You’ll want to set your aperture around f/8 to f/11 for sharp details, keeping the entire image crisp. A shutter speed of 1/250 sec or faster helps avoid motion blur, especially when there’s a gentle breeze.
Maintain your ISO at 100 to 200 on bright days for the best quality.
Composition Techniques: Rule of Thirds and Leading Lines
On your journey, apply the rule of thirds by dividing your frame into a grid. Position the Eiffel Tower on one of the intersecting points for dynamic compositions. Utilize leading lines, such as pathways or shadows, directing the viewer’s eye toward the tower.
The rule of thirds creates more compelling images by balancing your scene effectively. Placing the Eiffel Tower off-center captures viewer interest, while leading lines guide them naturally towards the subject.
This technique enhances the perspective you achieve at secret spots like Rue de l’Université, making your photos more engaging.
Utilizing Natural Light Effectively
If you want to capture the Eiffel Tower at its best, shooting during the golden hour—sunrise or sunset—will give your images a warm glow.
Avoid harsh midday light by positioning yourself in shaded areas to soften shadows.
With the right understanding of natural light, you can transform ordinary scenes into breathtaking visuals.
The softer light during early mornings can add a magical quality to your photographs, creating stunning reflections and ensuring your shots are free from harsh contrasts.
Technical Settings for Night Shots
After the sun sets, capturing the Eiffel Tower transforms with a magical glow. To make the most of your night photography, set your camera to a low ISO, ideally between 100-400, to reduce noise.
Use a wide aperture, around f/2.8 to f/4, to let in more light, and experiment with shutter speeds – starting from 1/15 to 1 second or longer for those enchanting light displays.
A sturdy tripod is important to maintain stability and capture those beautiful moments without blur.
Long Exposure Techniques for Bright Lights
If you want to experiment with long exposures, use a shutter speed of several seconds to create stunning trails of light from passing cars or the twinkling lights of the Eiffel Tower.
Employ a neutral density filter to manage too much light hitting your sensor, allowing for a softer and dreamier effect. Don’t forget to utilize a remote shutter release or your camera’s timer function to avoid any vibrations.
Managing Noise in Low-Light Conditions
To effectively manage noise in your low-light images, it’s best to keep your ISO settings as low as possible. Higher ISO settings can introduce unwanted grain, making your photos look less appealing.
Consider using noise reduction settings in your camera or software during post-processing to help mitigate this issue.
For instance, you might want to use a test shot at different ISO levels to see the impact on noise. Try taking a few pictures at ISO 800, 1600, and even 3200, then analyze how each setting affects the quality of your images.
You might find that during night shots, ISO 800 suffices to capture detail without overwhelming grain.
Night Photography Tips with Twinkling Light Shows
With the Eiffel Tower shining bright at night, it’s important to take advantage of these mesmerizing light shows. Arrive early to claim a good spot, and be mindful of your composition. Use a tripod, and try to capture multiple angles to showcase the twinkling lights effectively. Here are some key tips:
- Use a low ISO setting.
- Set a wide aperture for better light collection.
- Experiment with different shutter speeds.
- Focus on compositions that frame the Tower beautifully.
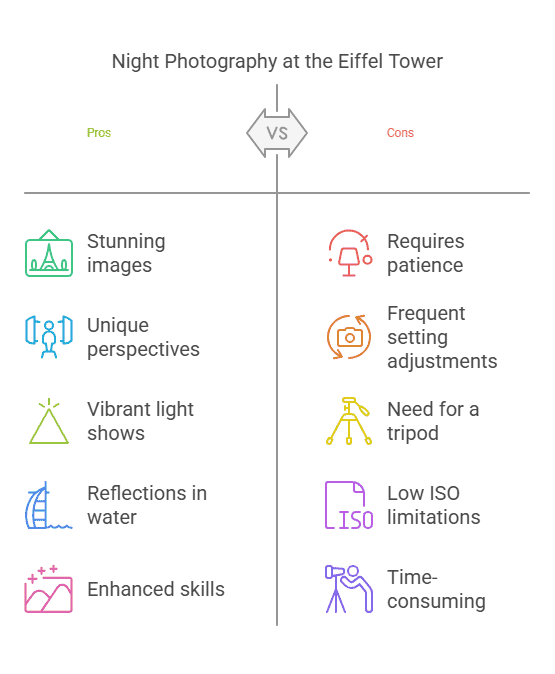
Any time you dedicate to perfecting your night photography will lead to stunning results!
Photography at night, especially during the Eiffel Tower’s lighting displays, can yield breathtaking images. Capture its grandeur by focusing on the reflections in nearby water and utilizing creative angles. Balancing your light exposure with the rapid changes in the light shows allows you to embrace the vibrance of the moment. Consider the following tips:
- Be patient; light shows can change quickly.
- Adjust your settings frequently to catch varying effects.
- Look for unique perspectives in your shots.
Any moment spent discovering the best light will enhance your photography experience!
Capturing Reflections
Now, when you’re aiming to capture stunning reflections of the Eiffel Tower, consider the Trocadéro gardens at sunrise. The stillness of the water creates a perfect mirror effect, offering a breathtaking view as the light unfolds.
This is your opportunity to get those Instagram-worthy shots with a touch of magic!
Techniques for Water Reflection Shots
While photographing reflections, position yourself low to the ground to maximize the mirror effect. Use a wide-angle lens to include both the tower and the surrounding scenery.
Aim for early morning or late evening for soft, diffused lighting that enhances the details in the water.
Urban Reflection Opportunities around the Tower
Some of the best urban reflection opportunities can be found along the Seine River or in the charming streets such as Rue de l’Université.
These locations allow for unique angles where the tower reflects against the water and surrounding buildings, providing a dynamic perspective!
This vibrant area includes historic architecture and charming bridges, making it a treasure trove for photography enthusiasts.
Don’t overlook the cobblestone streets, as they often capture reflections of both the sky and the Eiffel Tower, giving you varied compositions that can surprise you!
Post-Processing Tips for Enhanced Colors
Reflections can benefit from post-processing to enhance their vibrancy and depth. Focus on adjusting the color balance and saturation to make those hues pop! Here are some tips:
- Use a subtle boost in saturation for brighter reflections.
- Apply contrast adjustments to highlight details.
- Experiment with shadows and highlights for depth.
The goal is to reflect the essence of your experience.
Another technique is to use selective editing to brighten specific areas, such as the tower’s lights or vibrant sky. This will draw the viewer’s attention and create a captivating contrast. Additionally, consider using color grading to evoke a certain mood reflected in your image. The key is to keep your edits natural while enhancing the beauty of your reflections.
Editing Your Photos
Not all stunning photography emerges perfectly from your camera. The magic of editing allows you to refine your images, enhancing colors and correcting exposures, while turning your captures of the Eiffel Tower into works of art.
Recommended Software for Photo Editing
An array of software is available for photo editing. Popular options include Adobe Lightroom for its powerful organizational features and editing capabilities, while Canva offers user-friendly templates and designs that are easy for beginners to navigate.
Basic Editing Techniques for Enhancing Images
Your editing journey begins with a few fundamental techniques. Adjusting exposure and contrast can bring your photos to life, while cropping can help emphasize the Eiffel Tower’s stunning angles or frame your shots creatively.
Images can benefit greatly from minor adjustments. By playing with brightness, saturation, and sharpness, you enhance details and bring forth the layers of beauty in your composition. T
ools like curves and filters can also add a distinct touch to reflect the seasonal variations you captured, whether it’s cherry blossoms in spring or lights in winter.
Managing Expectations: Instagram vs. Reality
Even the most picturesque photos can hide some editing tricks. The perfect shots you see online often result from meticulous adjustments, lighting techniques, and a bit of luck—rather than a single click!
Another point to consider is that while you may aspire to recreate those breathtaking views from social media, actual conditions can vary greatly.
Balancing your creativity and expectations is vital; embrace your unique perspective and focus on capturing the authentic beauty of the Eiffel Tower, which may differ from the polished images you’ve seen on Instagram.
Tips for Creative Shots
Once again, think outside the box to create stunning images of the Eiffel Tower. Here’s what you can do:

- Visit the Trocadéro at sunrise for breathtaking reflection shots.
- Capture the magic of night photography with twinkling lights.
- Seek out secret spots like Rue de l’Université for unique angles.
- Embrace seasonal variations, from spring cherry blossoms to winter lights.
- Avoid crowds by planning for early morning or late evening shoots.
Recognizing these opportunities will elevate your photography game and help you capture the Eiffel Tower in unforgettable ways.
How to Experiment with Angles and Perspectives
On your journey to photograph the Eiffel Tower, try varying your angles and perspectives. Instead of the typical front view, explore side shots or even ground-level views to create more dynamic compositions.
Get creative by shooting from an elevated position or using objects in the foreground to frame your shot.
Incorporating People or Objects for Scale
On your quest for the perfect shot, consider incorporating people or objects to add scale to your images. Including visitors or local elements provides context and emphasizes the Eiffel Tower’s grandeur.
This technique can transform a simple photo into a breathtaking visual story.
Incorporating people or objects into your shots can showcase the sheer size of the Eiffel Tower. For instance, capturing a friend striking a pose with the monument in the background creates a personal connection.
Or, include local elements like a Parisian café table, which adds depth and context to your image while celebrating the essence of Paris.
Exploring Different Weather Conditions
Now is the perfect time to embrace the beauty of the Eiffel Tower amidst varying weather conditions.
Overcast days can bring out rich colors and soften shadows, while a sunny day highlights vibrant scenes.
Don’t shy away from rain—wet surfaces can create mesmerizing reflections and unique moods.
The versatility of the Eiffel Tower shines through in different weather conditions. On a foggy day, you can capture the iconic structure emerging mysteriously from the mist, delivering an enchanting vibe.
Bright sunlight illuminates the tower beautifully, while rain can lead to captivating reflection shots. Just remember, each weather condition offers a distinct atmosphere and adds an entirely new layer to your photography adventure.
Pros and Cons of Various Techniques
Many photographers use different techniques to capture the Eiffel Tower, each with unique advantages and drawbacks.
Understanding these pros and cons can help you determine the best approach for your photography journey.Pros and Cons of Day vs. Night Photography
| Advantages | Disadvantages |
| Natural lighting enhances colors and details | Crowds can be overwhelming, especially at popular spots |
| Spring cherry blossoms create stunning backdrops | Daylight can wash out colors during midday |
| Clear visibility for technical settings | Limited variety for night shots |
| Consistency in lighting conditions | Inconsistent weather may affect lighting |
| Great for capturing reflections at Trocadéro | Less dynamic scenes compared to twinkling lights at night |
Pros and Cons of Using Filters vs. Editing Software
While filters can add a beautiful touch to your photos directly on-site, they also come with some limitations that could affect your creative process.Pros and Cons of Using Filters vs. Editing Software
| Filters | Editing Software |
| Immediate results enhance on-site photography | Greater control over details and effects |
| Adds depth and color dynamics | Can correct mistakes made during capture |
| Encourages creativity in real time | Time-consuming editing process after shoot |
| Variety of options for specific conditions | Requires knowledge and skill to use effectively |
| Limited impact on certain lighting scenarios | Potentially high software costs |
Plus, filters can be great for quick adjustments, but they may not correct significant issues that occur during shooting. On the other hand, editing software grants you extensive control, allowing precise adjustments to achieve your desired look. However, be prepared for the learning curve and time investment required to become proficient.
Location-Specific Pros and Cons
There’s a unique charm to various locations around the Eiffel Tower that can enhance or complicate your photography experience.Location-Specific Pros and Cons
| Pros | Cons |
| Trocadéro offers stunning sunrise reflection shots | Can be crowded with tourists during peak hours |
| Rue de l’Université provides unique ground-up perspectives | Limited space for wide-angle shots |
| Seasonal variations provide diverse subject matter | Some spots may close off during events |
| Photogenic night lights create magical atmospheres | Lighting challenges for low-light shooting |
| Can capture iconic framing with surrounding architecture | Potential for interference from streetlights or other elements |
Pros of location-specific photography include diverse angles and backdrops that can elevate your images; however, be mindful of limited space and potential obstructions that can compromise your composition. With a bit of planning, you can maximize the beauty of your chosen spots.
Safety and Regulations
To ensure a successful photography experience around the Eiffel Tower, it’s important to be aware of local safety and regulations. For insights into Capturing Beautiful Images of the Eiffel Tower, the Louvre …, make sure to respect both the environment and fellow visitors while enjoying your photographic journey.
Tips for Safe Shooting Near Busy Areas
While navigating bustling tourist spots, keep these safety tips in mind to ensure a smooth shooting experience:
- Arrive early to beat the crowds.
- Stay aware of your surroundings.
- Carry your gear securely to prevent theft.
Thou can truly enjoy shooting without unnecessary stress.
Understanding Photography Regulations in Paris
Regulations regarding photography can vary widely across public spaces in Paris. Always check for signs that may indicate whether photography is permitted in specific areas, especially in places that often host crowds. Some sites may require permission for professional photography equipment.
Respect for Local Culture and Environment
Areas surrounding the Eiffel Tower are not only iconic but also culturally rich. Regulations regarding photography often include guidelines aimed at preserving the local charm, such as prohibiting tripod use in certain crowded areas. You should always respect local customs and be mindful of the environment, ensuring your presence enhances rather than detracts from the picturesque landscape.
Common Challenges and Solutions
Unlike many famous landmarks, capturing the Eiffel Tower presents its own set of challenges, from unpredictable weather to overwhelming crowds.
It’s imperative to anticipate and prepare for these obstacles to achieve the stunning shots you’re aiming for, whether at the Trocadéro for sunrise reflections or during dramatic night photography alongside twinkling lights.
Dealing with Changing Weather Conditions
Changing weather can significantly impact your photography session. Clear skies can quickly turn cloudy, dampening plans for stunning sunrise or sunset shots.

Always check the forecast ahead of time and consider keeping an umbrella or waterproof gear handy, so you can adapt.
Embrace the moody atmosphere that overcast skies can provide—sometimes a dramatic backdrop yields surprisingly beautiful results.
Navigating Crowds and Tourist Spots
Clearly, the Eiffel Tower attracts millions of visitors, making crowd management imperative for a successful shoot.
To capture your ideal photo without the interruption of other tourists, aim for early mornings or late evenings when the site is less crowded.
Patience may also pay off; waiting for the perfect moment can lead to that stunning shot you envisioned.
Weather affects not just your atmosphere but also the dynamics of foot traffic around the Eiffel Tower. Rainy days tend to deter tourists, potentially granting you more space for peaceful photography.
Additionally, use popular photo spots like the Trocadéro in the early hours, when the sun rises to illuminate your shots and the crowds have yet to gather, granting you the opportunity to capture the architecture unobstructed.
Technical Issues with Gear and Settings
One of the biggest challenges you may face is technical issues with your gear and settings. Ensure your equipment is ready with fully charged batteries and cleared memory cards before heading out.
Check your settings according to the lighting conditions—opt for lower ISO for bright mornings or higher settings at night to capture all the twinkling lights effectively.
Gear troubleshooting can be a headache, especially in a bustling location like the Eiffel Tower. Keep a lens cloth for cleaning, and if your camera is behaving unpredictably, try resetting it to factory settings.
Familiarize yourself with all your gear prior to your shoot so you can quickly adapt when conditions change—this includes mastering the settings that will help you transition between stunning day and night shots seamlessly.
Final Words
Upon reflecting on your adventures capturing the Eiffel Tower, you now have a treasure trove of insights at your fingertips.
From the stunning dawn reflections at Trocadéro to those enchanting night shots filled with twinkling lights, each moment offers a unique perspective. Embrace the charm of hidden spots like Rue de l’Université, and let seasonal variations inspire your creativity.
With the right timing and settings, your photos will beautifully convey the magic of Paris. So grab your camera, venture out, and enjoy every moment of this extraordinary journey!
FAQ
What is the best time of day to photograph the Eiffel Tower?
The best times for capturing stunning images of the Eiffel Tower are during sunrise and sunset. Early morning offers serene lighting and fewer crowds, allowing for beautiful reflection shots from Trocadéro.
During sunset, the golden hour enhances the colors, creating warm tones as the sun dips below the horizon.
Night photography is also magical, especially when the tower sparkles at the top of each hour.
Are there any secret spots for unique perspectives of the Eiffel Tower?
Yes! One hidden gem is Rue de l’Université, which provides a picturesque ground-up perspective of the Eiffel Tower framed by charming Parisian streets.
Another lesser-known spot is the Pont de Bir-Hakeim, which offers stunning views and a unique angle, especially at dusk or dawn.
Exploring various nearby parks can also reveal unexpected angles.
What technical settings should I use for daytime vs. nighttime photography of the Eiffel Tower?
For daytime photography, use a lower ISO (100-200), a smaller aperture (f/8 to f/11) for a greater depth of field, and adjust your shutter speed based on lighting conditions.
In low-light or nighttime conditions, increase the ISO (800-1600), use a wider aperture (f/2.8 to f/5.6), and experiment with longer shutter speeds (1-10 seconds) for light trails.
Remember to use a tripod for stability in low-light situations.
How can I avoid crowds while photographing the Eiffel Tower?
To capture the Eiffel Tower without large crowds, plan your visits for early mornings or late evenings on weekdays.
Arriving before sunrise ensures less foot traffic while providing stunning lighting conditions.
Additionally, visiting during off-peak seasons can further reduce the number of tourists, allowing you to frame your shots more easily.
How can I manage my expectations for photographing the Eiffel Tower for social media?
While social media can showcase flawless images of the Eiffel Tower, it’s important to manage expectations.
Understand that the best memories come from personal experiences rather than just perfect photos. Focus on capturing moments and emotions rather than aiming solely for Instagram-worthy shots.
Embrace unique conditions, such as changing weather and the ambiance of the locale, which may enhance your storytelling through photography.


